Note: This article is a little out-of-date. We recommend this guide for more up-to-date instructions.
What is Google Analytics?
Google Analytics is a tool for understanding how people find and use your website. It can be used to understand things like:
- How many people visit your website
- Which pages they look at
- Which marketing channel they may have come from
- Whether they make an online booking (or not)
How to Set Up Google Analytics for a Medical Centre
1. Create a Google Analytics account
Go to Google Analytics
- Go to https://analytics.google.com and sign in with a Gmail account
- If you don’t have a Gmail account, you’ll need to create one first
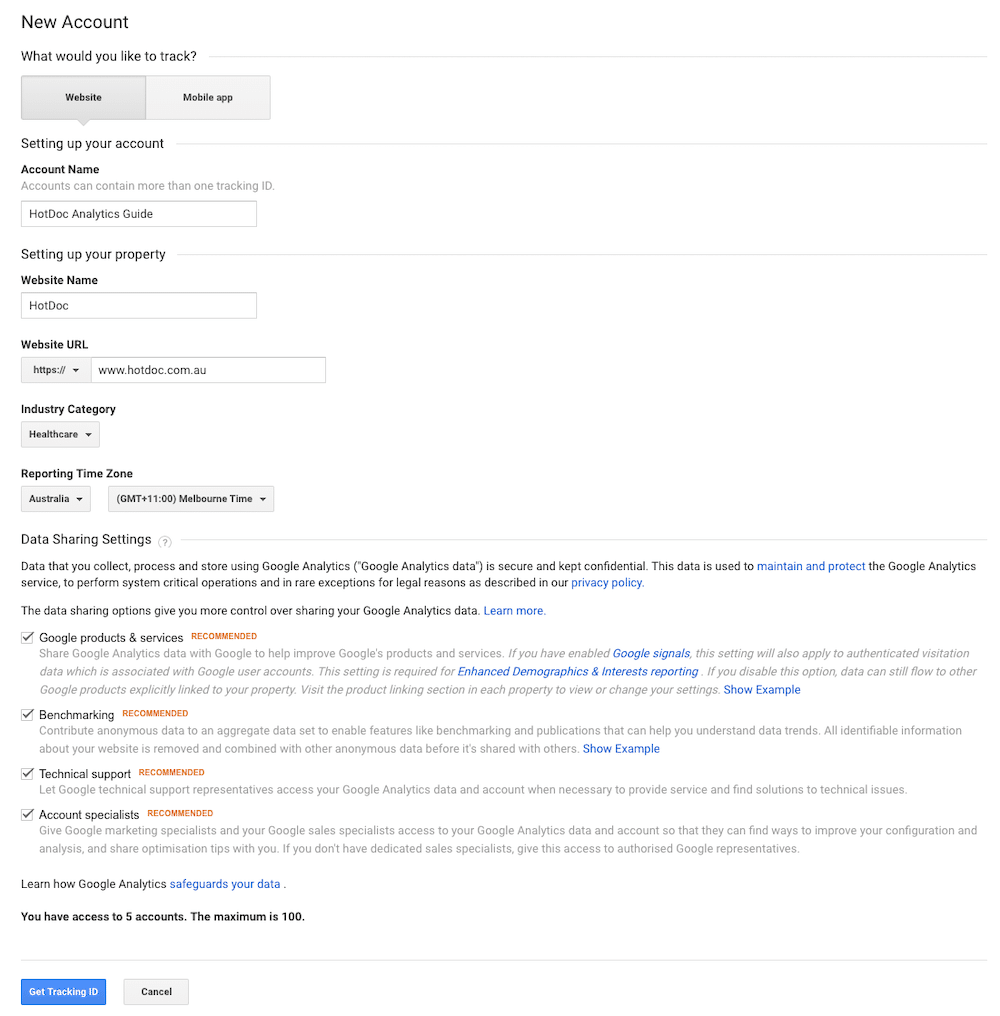
Create an account
- Give your account a name (i.e. your Practice Name)
- Give your website a name (i.e. your website URL)
- Set your industry to “Healthcare”
- Set your timezone
- Click ‘Get Tracking ID’
2. Install a Tracking Tag
You need to insert this code on your website. If you know what you’re doing, follow our instructions below. Otherwise, send the tracking code and instructions to your website developer / IT support and they can hopefully help you get it installed. Once they have installed it, jump to the next step.
Specific guides and tools for installing Analytics
Some website tools will have plugins or their own specific guides, which you can follow to make things easier. Most systems will have a guide or some support for Google Analytics, so it might be a good idea to have a quick search for your own system’s guidance. We will list some common ones here:
| Website Technology | Guide / Tool |
| WordPress | Monsterinsights is the most popular free Analytics plug-in. |
| Wix | Guide to installing Analytics on Wix |
| Squarespace | Guide to installing Analytics on Squarespace |
| Joomla | Guide to installing Analytics on Joomla |
Can’t find anything for your website? Don’t worry, we’ll also explain how to install it manually (below).
WARNING
We recommend you get a Website Developer / savvy IT person to help you install Analytics manually as it may involve changing website code. If you save a file with a mistake, it might break your website!
Manually install the tracking tag on your website
After your setup, Google will present you with a ‘Global Site Tag (gtag.js)’.
It will look something like this:
<!-- Global site tag (gtag.js) - Google Analytics -->

<script async src="https://www.googletagmanager.com/gtag/js?id=your-tracking-ID"></script>

<script>

  window.dataLayer = window.dataLayer || [];

  function gtag(){dataLayer.push(arguments);}

  gtag('js', new Date());

  gtag('config', 'your-tracking-ID');

</script>
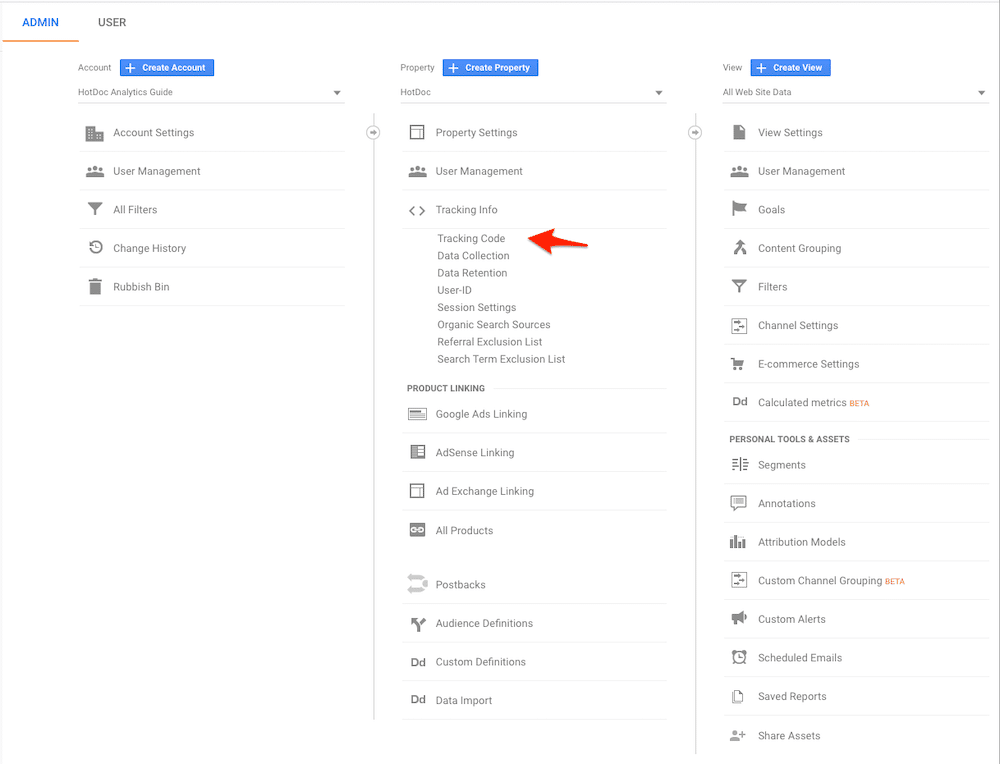
Now, you need to add this Tracking Tag as the first thing in the HTML ‘‘ so that it appears on every page of your website.
To do this, you’ll need access to your website code. Once you have access, you’ll need to locate your ‘‘. For most systems, this will be part of some kind of template. In WordPress, for example, it is in your ‘Theme’ folder, which will be named whatever you theme is called.
Inside your theme folder, you’ll find another folder called ‘Templates’, with a file inside called ‘head.php’. Open up ‘head.php’ and you should find the opening tag fairly near the top. Paste your tracking code just after this tag, save and close the file.
How to check that your analytics is installed properly
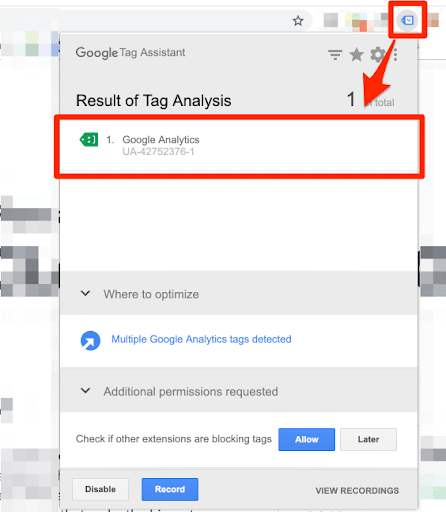
- In Google Chrome, install the Tag Assistant extension and activate it
- Go to your website in Chrome, and open up ‘Tag Assistant’
- It will tell you the details of any Google Analytics tags it detects. If it doesn’t find any, your tag is not installed properly
3. Create your Views
What is a view?
A view is how you look at your data. We recommend you create two views — one that is filtered, which we’ll walk through next, and another that is completely unfiltered.
Google recommend keeping an unfiltered view to act as a backup. This is because when you create a filter for a view, sometimes you may remove some data you didn’t intend to and there is no way to get filtered data back again. The unfiltered view means you at least have all your data recorded somewhere, just in case.
Create your Unfiltered View
- Open up ‘Admin’
- Click on ‘+ Create View’
- Call it something like “Unfiltered View – Do Not Use”
- Set the timezone, and then click ‘Create View’
Create your Primary View
- Open up ‘Admin’
- Select your default view, usually called “All Web Site Data“
- Open ‘View Settings’
- Rename it something like “Primary View”
- Ensure the timezone is correct
- Adjust the currency to ‘Australian Dollar’
- Check the box for ‘Bot Filtering’
- Click ‘Save’
4. Set up filters
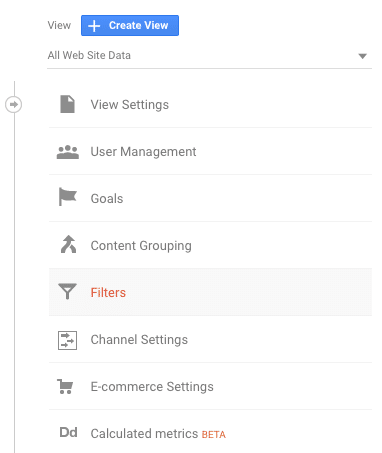
Adjusting the filtered view in Analytics makes sure that your data is clean, accurate and easier to understand. Filters are located in ‘Admin’, and under the ‘View’ section.
Creating a filter
For each of the following filters instructions, you’ll need to create a new Filter. To do this, go to ‘Admin’, select your ‘Primary View’, go to ‘Filters’ and click ‘Add Filter’.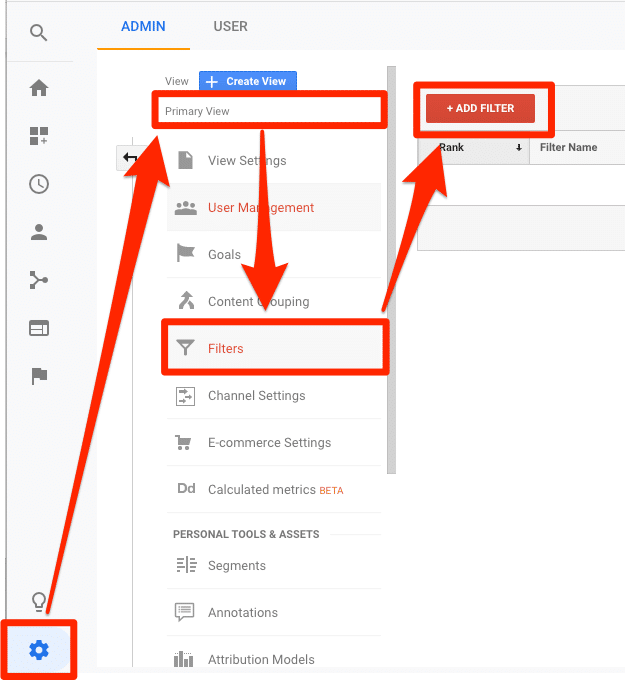
Remove Internal Traffic
When your staff visit your website, they can throw off some of your data. To remove internal traffic, first you need need to find out your internal IP Address.
The simplest way to find this is to Google “What is my IP”: https://www.google.com/search?q=what+is+my+ip
Note: If you have multiple locations, you’ll need to get the IP Address of each location.
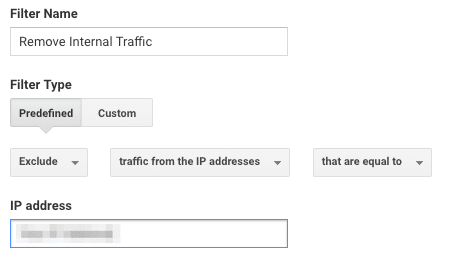
Once you know your IP Address(es), you need to create a new filter with the following settings, adding your IP address at the end.
Lowercase URLs
Analytics is case sensitive. That means it will treat ‘myclinic.com.au/bookings’ and ‘myclinic.com.au/Bookings’ as different pages. To avoid splitting your data like this, we can force all URLs into lowercase with the following filter.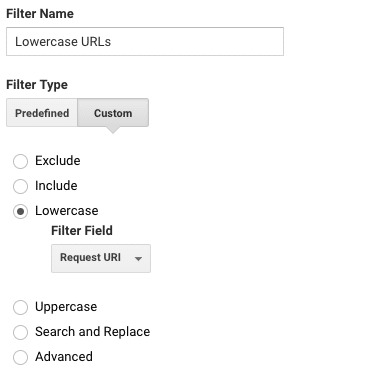
Lowercase Campaign Tags
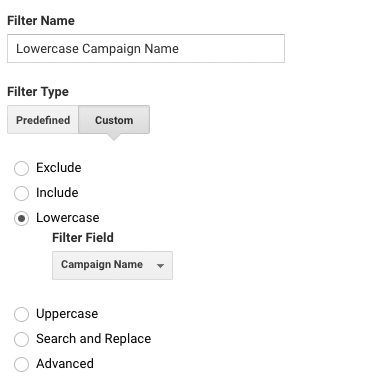
Similar to URLs, campaign tags often get sent through with various combinations of upper and lower case. To prevent this happening, you need to create 3 separate filters (for each standard campaign tag).- Campaign Name
- Campaign Source
- Campaign Medium
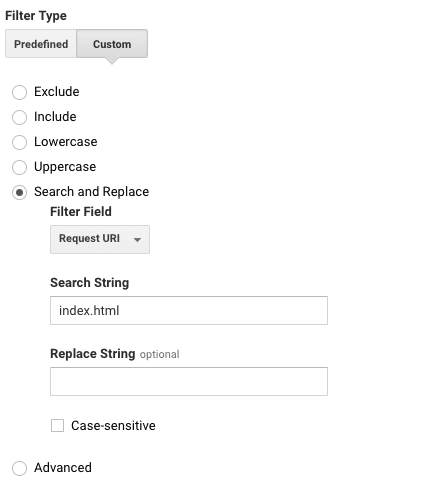
Remove Trailing Index
A trailing index refers to any additional files or technical information appended to your website urls which you don’t want recorded. The most common ones are:- /index.html
- /index.asp
- /index.php
5. Link other services
We recommend you connect Google Analytics with the Google Search Console to give you better data in your organic search reports. Note: You’ll need to have already created your Google Search Console account and made it accessible to the Gmail account you are using to log into Analytics.
We also recommend anyone using Google Ads (AdWords) to connect Analytics to their Google Ads account. Again, this pulls additional data into your Analytics (such as cost-per-click and click-through-rate) to help your reports provide more insights into your marketing performance.
Linking Google Search Console / Google Ads
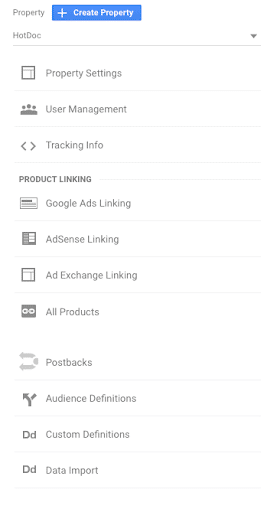
- Open up ‘Admin’, under ‘Property’ click ‘All Products’
- Select ‘Link Search Console’
- Select your Search Console account from the list and click ‘Continue’ (If it doesn’t appear, check that you have created an account and that you can access the account from the Gmail you’re using to access Analytics)
- Turn this link ‘ON’ for all of your ‘Views’ and click ‘Link accounts’
Repeat the same process for Google Ads.
6. Create your Goals
Goal tracking is critical for understanding the outcomes of your website. All websites should have goals. Otherwise why do they exist? Without goals it’s difficult to measure success (or failure) of your website. It’s also impossible to optimise or improve your website.
Creating goals can be a little tricky because they can be different for each website. For this reason, we can’t provide a step-by-step guide for everyone. However, what we can do is provide you a brief overview of Analytics Goals and Analytics Events, followed by some basic examples of when a clinic might use them. Then, we will take you a specific example of how a website with the HotDoc widget installed can set up goals to track online bookings.
If you don’t use HotDoc, you may have to do some research to find out how goals can be tracked on your website. This guide will help you understand what to look for.
What is a Goal?
A goal is a specific action taken on your website that you want to track. The primary goals for most practice websites will be things like:
- Booking an online appointment
- Clicking off to a external booking service
- Requesting a repeat script / referral
- Clicking a ‘Call’ button
However, goals should cover all uses of your website, not just the primary audience (patients). Secondary goals we medical practices could be things like:
- Patient registration forms
- Clicking a ‘Get Directions’ button
- Downloading / reading specific medical information
- Subscribing to a newsletter
- Applying for a job
Types of Goals
Google Analytics can track Goals in various ways, two of which are relevant to clinic websites:
1. Destination Goals: Destination goals are tracked when a user reaches a specific page on your website. This is usually a page that can only be reached after completing a specific action, such as a /thank-you page after making an online booking or subscribing to a newsletter.
2. Event Goals: This is when a goal is tracked with something called an ‘event’ (which we will cover in more detail below). For example, when a patient books an appointment with the HotDoc Online Bookings widget, it triggers an event which you can use to create a goal in Analytics.
Selecting Goals
There are still a number of possibilities with the kinds of goals you can choose with Analytics. For HotDoc users, we provide a large amount of anonymised conversion information through our HotDoc Booking Widget.
Measuring each ‘appointment type’ as separate goals may be useful when running specific advertising campaigns, such as a flu immunisation campaign. If you’ve been posting about flu immunisations on your Facebook page and you see an influx of appointments coming from Facebook, you know your marketing is working.
‘Appointment type’ goals are also useful when you’ve got specific revenue figures for each type of appointment, which means you can assign a value to each goal and start tracking a $ figure against your website conversions.
Measuring ‘new vs. existing’ patient bookings as goals would help you understand how each of your marketing channels is doing at adding new patients. Google Search Ads, for example, have a habit of sometimes attracting higher numbers of existing patients than practices expect. In most cases, these patients probably would have booked with you anyway, so you don’t really want to be paying for them. Having different goals for new and existing would help you see when this happens, allowing you to modify your keywords accordingly.
Measuring each ‘Doctor’ as a separate goal is perhaps less useful, but can still be useful. For example, you might want to understand which profiles/images are working well on your widget. Perhaps you could use it to understand how the Doctor order affects conversions. If one Doctor consistently wins over another, perhaps you should look at the Doctor profile/position not doing as well and try to improve it.
Limitations of Analytics Goals
Analytics Goals have some limitations that you should be aware of when selecting which goals you want to track.
- If you create goals that overlap, it will track multiple conversions. For most people, this is not what you want and will give you false stats
- Due to the fact that goals cannot overlap, you usually have to create a number of variations of goals in order to track everything you want to track separately
- Analytics only allows a maximum of 20 goals on its free version
For example, if you wanted to track conversions for each doctor at your practice, each would require their own goal. Let’s say you had five doctors. That’s five out of your 20 goals used already.
Now, let’s say you also want to track new vs existing patients separately. In order to not overlap with the 5 GPs you’re tracking, you need to create a new and existing patient goals for each doctor. That means you’ve got 10 goals (2 per doctor across 5 doctors).
Now, let’s imagine you want to track some specific appointment types separately too, such as immunisations and health check appointments, on top of your standard consults. Again, you would need to do this for each doctor, across new and existing patients, in order to prevent the goals from overlapping. This means you need three appointments, across five doctors, across two types of patient, making 30 goals.
For this reason, you will need to be selective about your Goals and choose only the most important outcomes. Don’t forget, you don’t need to track everything as a goal because (if you use the standard HotDoc Event Tracking) you will be receiving all this information as Events, so you can still analyse this information when you need to.


